Please note: If you buy through the links in this article, we may earn a small share of the profits.
Before COVID, I was the type of moviegoer who went to the theater once a week. I did Moviepass, and I had AMC A-list — but when theaters reopened, I didn’t resume my old habit. A major reason was that so many movies go straight to streaming. It just didn’t make sense to jump back into paying for those memberships. But I didn’t love the experience of watching capital “F” feature films on my 38-inch television, so I did what any self-respecting movie-lover does: I learned how to build a home theater in my one-bedroom apartment.
I sought out the expertise of cinematographer and film professor Tal Lazar, who has been involved in countless film productions, including Every Time I Die. With his help, I selected the appropriate projector, screen and more for my setup. Lazar says, “A lot of the choices that filmmakers take time and effort to design for an audience are lost when people are not watching movies in their intended setting.” He cites 1917 and Lawrence of Arabia as examples of films where the cinematic experience is optimized for the big screen and necessarily diminished if you watch on a television screen or *gasp* phone.
“Many people think it’s difficult and expensive to replicate the theater environment at home,” Lazar says. “But actually, it’s never been easier.” Speaking from personal experience, I was shocked by how quickly it came together. A few Amazon orders and a Taskrabbit was all it took to transform my living room. I’ve been much more apt to host guests since my projector was installed and while I love watching movies on the big screen, I’ve been using it just as often for music video marathons on YouTube. Read on to see Lazar’s top picks for each component of your DIY home theater.
Preparing your space
Lazar says the most important factor to consider is the size of your room versus the size of the image that will be projected. “People assume the bigger the better,” he says, “but when the room is small, a huge screen strains your eyes — just like when you’re at a theater and you sit too close.” To determine what size screen your room will optimally accommodate, use the throw calculator here. Off the bat, it asks for your projector model (to give you an accurate calculation), so you do need to know which projector you want before determining what size screen to buy. Input the throw distance (probably the length/width of your room depending on where you plan to place the projector), and it will spit out your optimal diagonal screen length. You should also consider where cables will run (and how many feet you’ll need). For example, my Apple TV is in the front of my room whereas the projector is mounted at the back so I have an extra-long, ultra-slim HDMI cord running beneath the carpet.
Home Theater Screens
Elite Screens Manual B 100-Inch
The ultimate budget screen is a blank wall, but if that’s a bit too bare-bones for you, it’s easy to keep your screen purchase under $100. This wallet-friendly manual screen pulls down and retracts like a map in an old-school classroom. This screen (and the next option) is 100 inches, but make sure to use the throw calculator to determine the right size for your space. Choose the 16:9 aspect ratio (same as television screens). Pro tip: Before you purchase a screen make sure you check your ceiling or wall to make sure you can drill into it.
Elite Motorized Screen 100-Inch
If you’re at all worried that after buying all this equipment, it will be inconvenient or a pain to load, fear not. My whole setup takes only one minute to warm up and is even quicker to power down. I opted for this motorized screen because being able to bring the screen down and up with a button adds an extra-professional touch that I appreciate. For those who don’t need a retractable screen, Elite also makes fixed frame and portable screens.
Home Theater Projectors
Optoma HD146X High Performance Projector
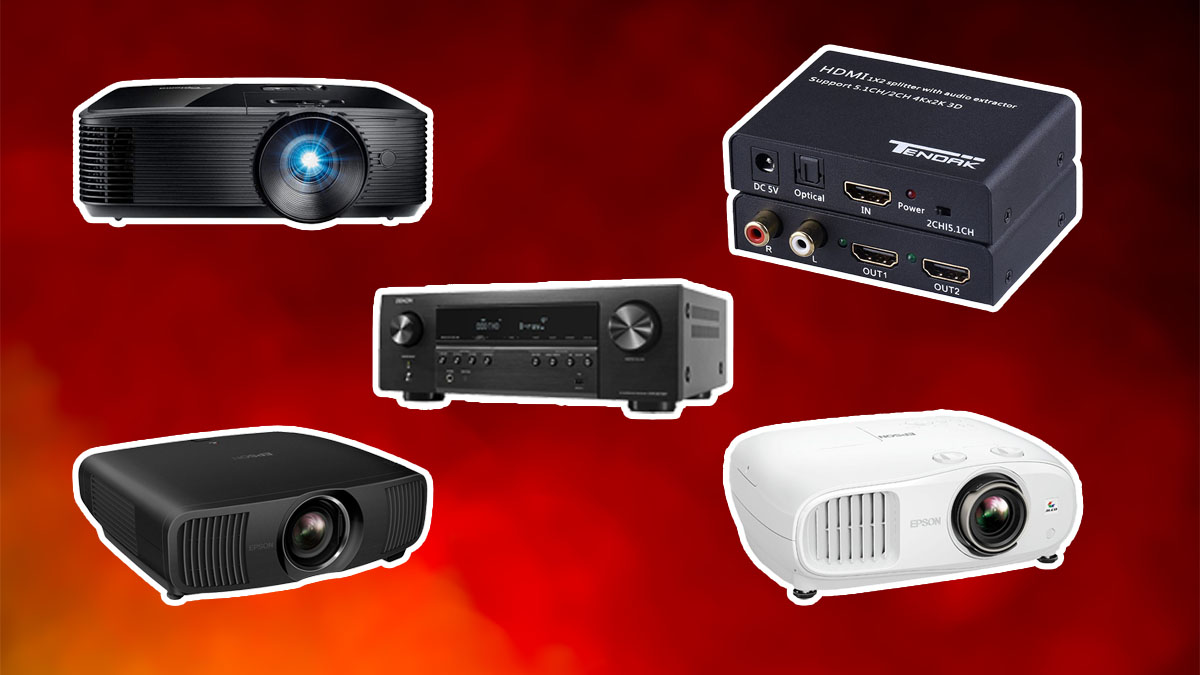
Lazar explains that there are two types of projectors: DLP and LCD. DLP models use tiny mirrors to create the image and are typically cheaper than LCD. This model from Optoma is a great entry-level projector that works well if you don’t have blackout shades and intend to use it in the presence of some ambient light. This is the model I have, and it looks great at night even though I have lots of city light pollution (and no window treatments yet) in my living room. Lazar says it’s a great choice for smaller rooms and at 6.2 lbs it’s light enough that you can place it on a standard shelf and avoid dealing with mounting it. As far as drawbacks go, it’s an HD (not 4K) projector but Lazar says “the effect in a living room environment would be negligible.”
Epson Home Cinema 3200
Instead of using tiny mirrors, an LCD projector creates an image similar to the way a computer screen creates an image. Compared with its DLP counterparts, an LCD projector has a sharper image and a higher contrast ratio (the black level is more black and the whites more white). This Epson model has a significantly higher contrast ratio and lower brightness compared to the budget model (2900 vs 3600 lumens). Lazar says when shopping for a projector he prioritizes contrast over brightness for two reasons: 1) he typically watches movies at night and 2) a high contrast ratio is what makes the image look movie theater-esque. He explains when you pay extra to see a movie in a Dolby Cinema, the elevated experience comes from a superior projector with a much higher contrast ratio than even the standard theater projector. Unlike the Optoma model, this projector is 4K (also known as ultra-HD). If you’re watching Netflix with your projector, Lazar notes that to reap the benefits of 4K, you need to get the 4K Netflix subscription — it’s not enough to just have a 4K projector.
Epson Pro Cinema LS12000 4K PRO-UHD
Clocking in at almost ten times more expensive than the budget projector is this 4K LCD Epson model. With the lowest brightness (2700 lumens) of the Lazar-recommended models, but a remarkable 2,500,000:1 contrast ratio, we can see that manufacturers are putting more emphasis on contrast ratio in their high-end projectors. The bulb in this projector is laser phosphor, which will enhance the feeling of being at a movie theater since this is the same type of bulb found in cinema projectors. Going with a high-end projector requires a little more planning because the significant weight (28 lbs) means you will likely need custom carpentry and/or professional help to install it safely. The extra investment may be worth it because, in addition to the added enjoyment factor, you’ll probably find that watching your projector causes less strain on your eyes because you’re watching reflected light, as opposed to a television that emits light at you.
Home Theater Speakers and Components
Klipsch Black Reference Theater Pack 5.1 Surround Sound System
To create a surround sound experience at home, Lazar recommends this Klipsch system for a reasonably priced set of speakers. He notes that while it is possible to buy speakers one at a time (and build out your system as your budget allows), buying a package with speakers that are designed to work together takes out all of the guesswork and trial/error process. With the number of speakers included in this set, you’ll be able to place some behind you and to the side, as well as in front for the audio experience that the filmmakers intended. (Be aware that you will need to purchase a receiver with this sound system.)
Denon AVR-S570BT Receiver
A receiver allows you to toggle between multiple sources (Apple TV, Nintendo Switch, BluRay Player, etc.) and to switch between a TV and projector with minimal effort. It also allows you to play audio from all sources on one set of speakers. Lazar refers to the receiver as the switchboard of your home theater setup. The cost for a receiver ranges from the low hundreds to over a thousand dollars. When choosing one, you want to look for compatibility with your projector. For example, if you have a 4K projector you need a receiver that supports 4K. You also need to make sure there are enough inputs (Apple TV, Roku, cable, etc.) and outputs (TV and projector are separate outputs) for your needs. This Denon receiver has 4 inputs but only 1 output for video, so you wouldn’t be able to toggle between watching on a TV and a projector. If you want multiple outputs, the Denon X3700H ($1,200) has 7 inputs and 3 outputs.
Tendak HDMI Splitter
If you’re trying to keep costs down, a great alternative to buying a receiver is this $38 HDMI splitter. It allows you to use multiple outputs, which I use for my TV and projector. The splitter outputs both simultaneously. This means if I happen to leave the TV turned on behind my screen while the projector is on, the image will appear on both screens. However, the downside of not having a receiver is that I can’t control the volume of my speakers the way I would with a receiver remote (I have to manually turn the knob).
Bose TV Speaker
A soundbar is the most expedient (and likely cheapest) solution for all your audio needs. Rather than futzing around with a receiver, you can bypass the question entirely with a soundbar. If you’re using an Apple TV with your projector setup, you can connect to the soundbar via Bluetooth and you’re good to go. This speaker from Bose has over 5,000 five-star ratings from Amazon reviewers and is lauded for its extra-crisp sound. The slim profile (2.21″ H x 23.38″ W x 4.02″ D) makes it easy to fit on a console table or mount to the wall.
Hardware
Gibbon Mounts Universal Ceiling Mount
Mounts are available for many different weights and sizes, so be sure to check the weight of your model before purchasing one, but this universal model works with all three projectors Lazar recommended. It has a capacity of up to 33 lbs and it can conveniently be mounted either on the wall or the ceiling. Lazar recommends buying a mount that accommodates a model heavier than what you need so if you upgrade projectors in the future (higher-end models are always heavier) you don’t need to change the mount.
D-Line Cord Hider
I initially told Lazar that I didn’t mind cords showing and could forgo cord hiders — boy was I wrong. Not only were there many more feet of exposed cord than I expected, but they were also hanging from multiple ceiling corners. I ended up getting several types of cord hiders so they could run along the perimeter of the room and bend at the corners, which rendered them virtually invisible. The room looked unimaginably messy without the cord hiders so take it from me and don’t cut this corner — it makes a massive difference in presentation.
We've put in the work researching, reviewing and rounding up all the shirts, jackets, shoes and accessories you'll need this season, whether it's for yourself or for gifting purposes. Sign up here for weekly style inspo direct to your inbox.