

Choosing Sauna Size and Type
“First, you have to decide if you’re going indoor or outdoor,” Bollman says. “Then, you have to think about how many people you would imagine having in it at a given time and, secondarily, if you want to be able to sit in it or do you want to be able to lie down in it. You also need to decide if your heat source will be electric or wood-burning. The latter takes up significantly more space, but you get the crackle of the wood and you also get the natural light of the fire passing through … I put it on a piece of the property that’s fully off grid — but there’s so much wood.”
“First, you have to decide if you’re going indoor or outdoor,” Bollman says. “Then, you have to think about how many people you would imagine having in it at a given time and, secondarily, if you want to be able to sit in it or do you want to be able to lie down in it. You also need to decide if your heat source will be electric or wood-burning. The latter takes up significantly more space, but you get the crackle of the wood and you also get the natural light of the fire passing through … I put it on a piece of the property that’s fully off grid — but there’s so much wood.”

Choosing the Location
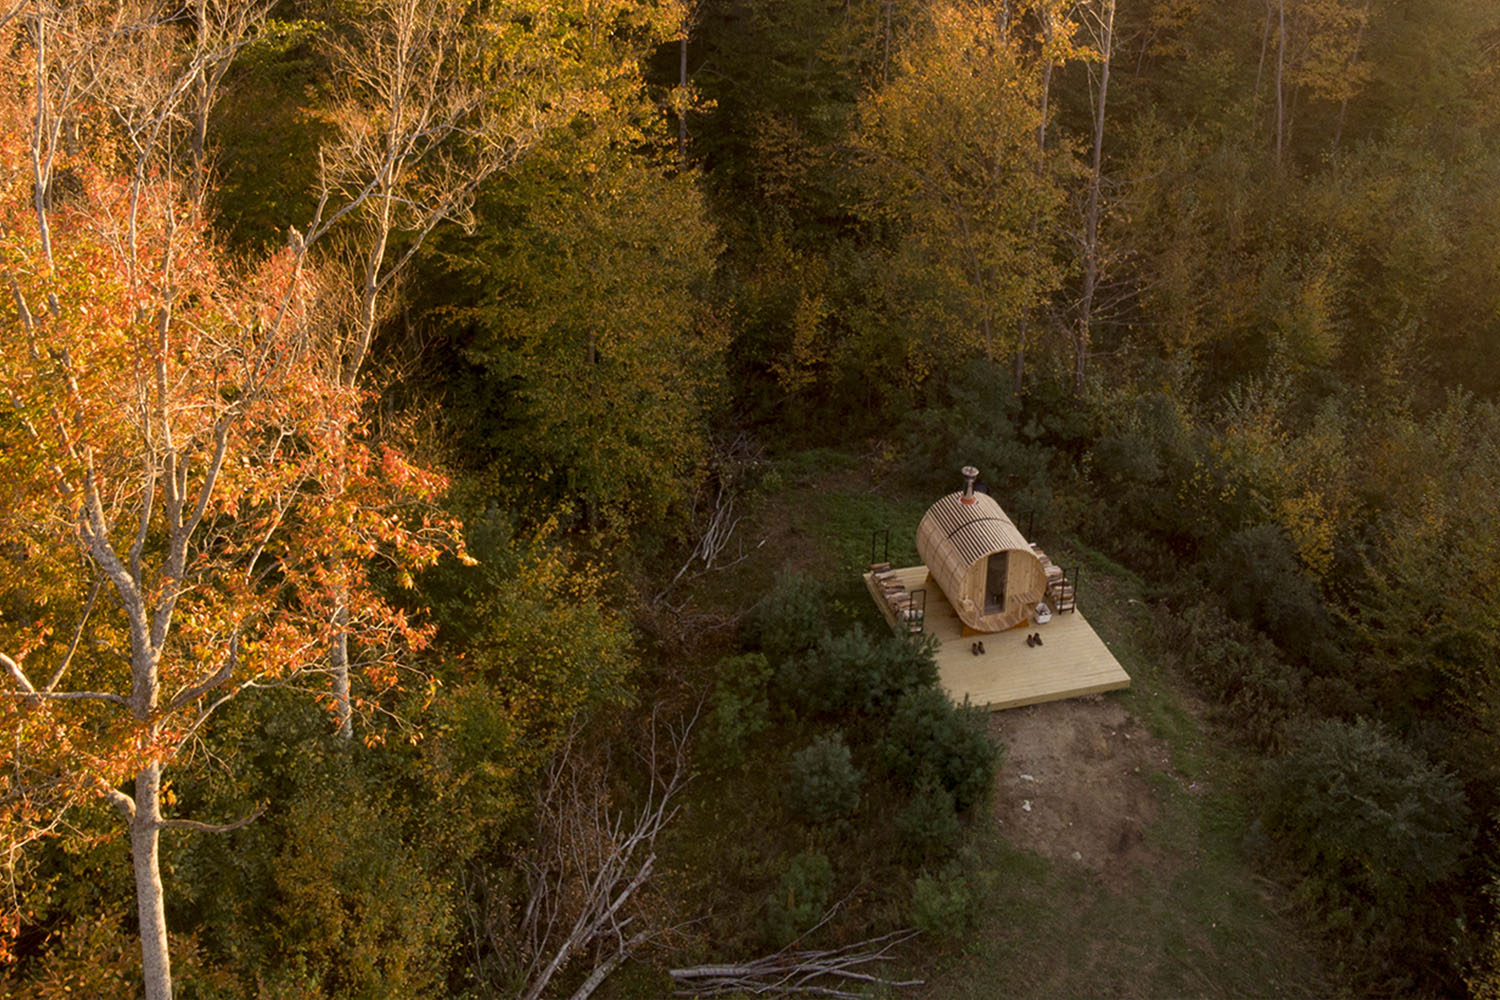
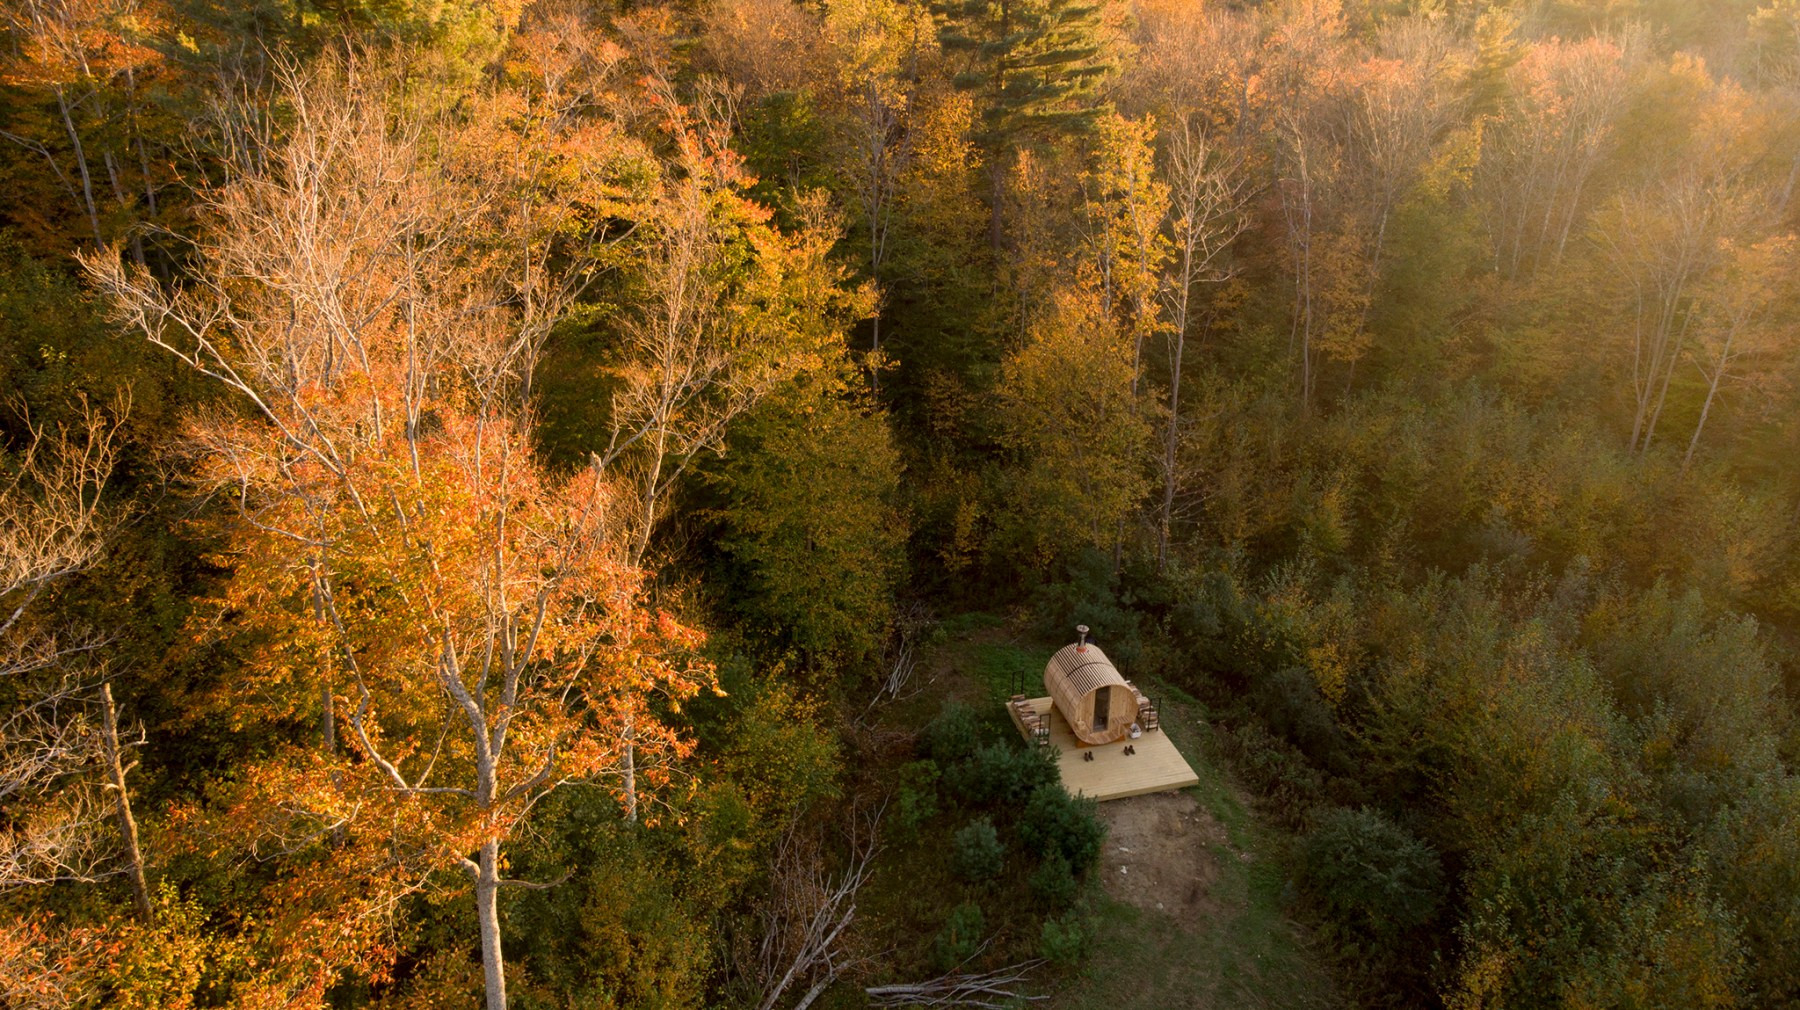
“The location is probably the most important decision. The closer you are to where you’re going to be staying and living, the more you’re going to use the sauna. I strategically cleared an area that was as close as I could get it to the house without being able to see the house at all. It’s all angles. If you were blindfolded and taken out there, it would feel like you’re in the middle of thousands of acres of wilderness. But it’s only like a 100-yard walk from the cabin. You can have two completely separate worlds where you aren’t seeing the house from the sauna and you can’t see the sauna from the house.”
“The location is probably the most important decision. The closer you are to where you’re going to be staying and living, the more you’re going to use the sauna. I strategically cleared an area that was as close as I could get it to the house without being able to see the house at all. It’s all angles. If you were blindfolded and taken out there, it would feel like you’re in the middle of thousands of acres of wilderness. But it’s only like a 100-yard walk from the cabin. You can have two completely separate worlds where you aren’t seeing the house from the sauna and you can’t see the sauna from the house.”

Building the Foundation and Platform
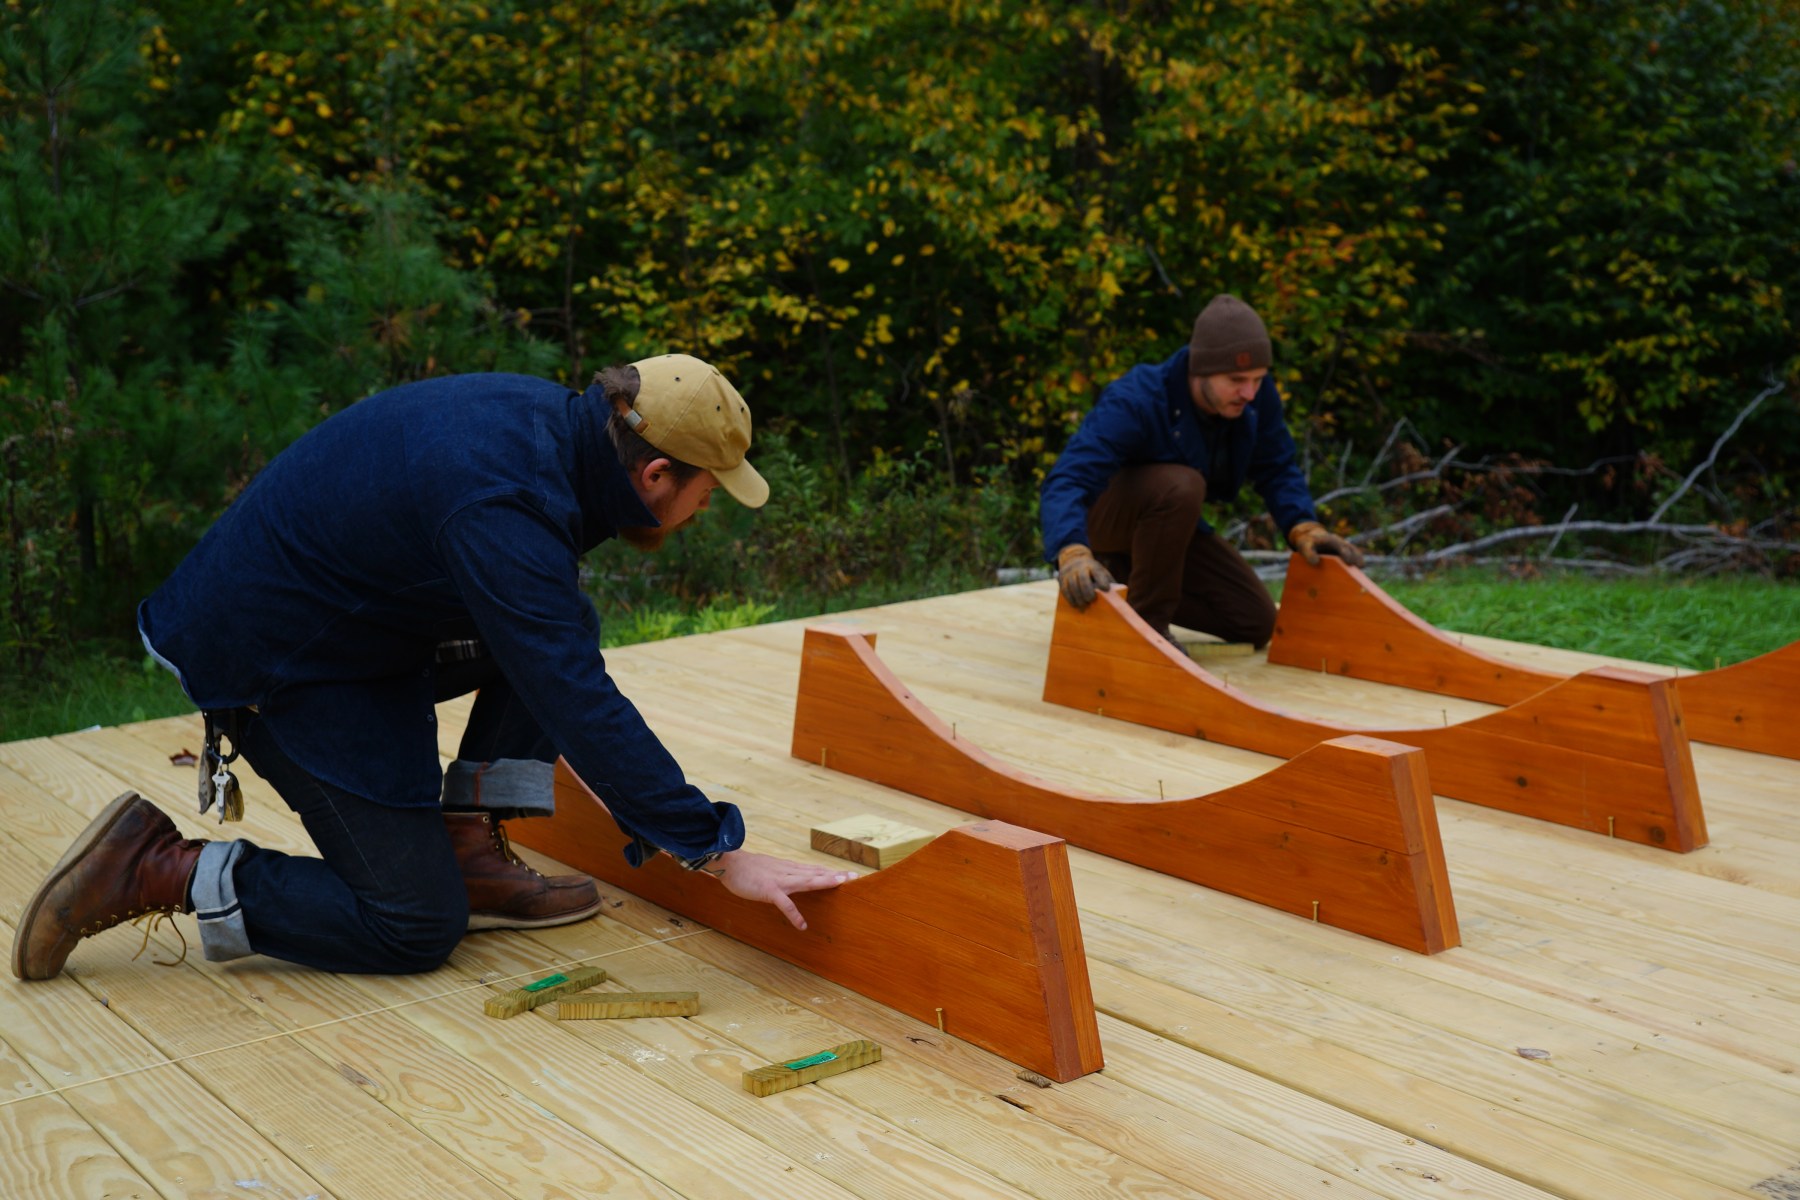
“Unless you want to be lifting up the sauna itself and changing out the trusses that hold it in place every number of years, you need to have some sort of platform. Some people will bring in gravel and some people pour a concrete pad. In my case, I wanted it to be off the ground because it’s in the woods, so it’s a foot or so up on a pressure-treated deck platform and leveled. In the summer, you can throw a couple of lawn chairs and put down towels … it extends the use factor in that you can go in and out of it. And it also lengthens the life of those truss boards.”
“Unless you want to be lifting up the sauna itself and changing out the trusses that hold it in place every number of years, you need to have some sort of platform. Some people will bring in gravel and some people pour a concrete pad. In my case, I wanted it to be off the ground because it’s in the woods, so it’s a foot or so up on a pressure-treated deck platform and leveled. In the summer, you can throw a couple of lawn chairs and put down towels … it extends the use factor in that you can go in and out of it. And it also lengthens the life of those truss boards.”
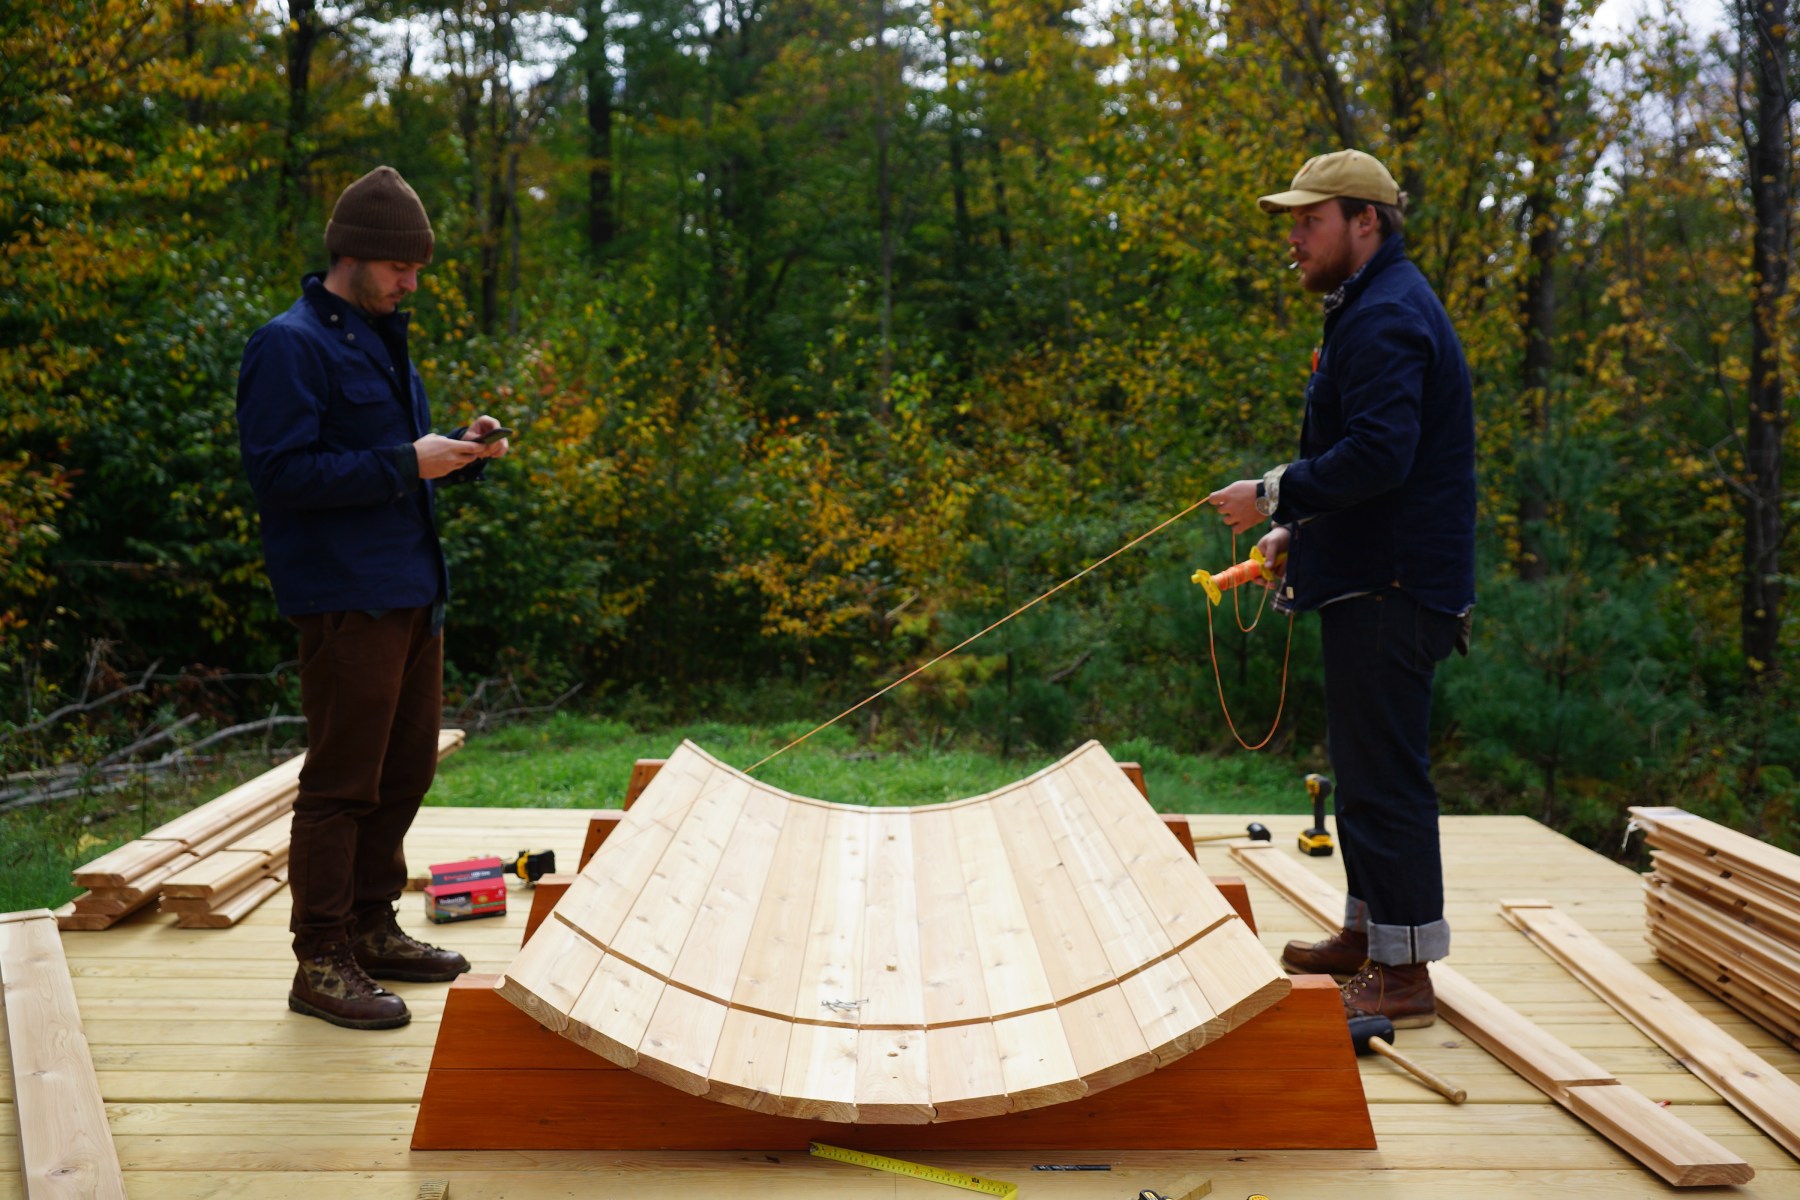
Building the Barrel with Staves
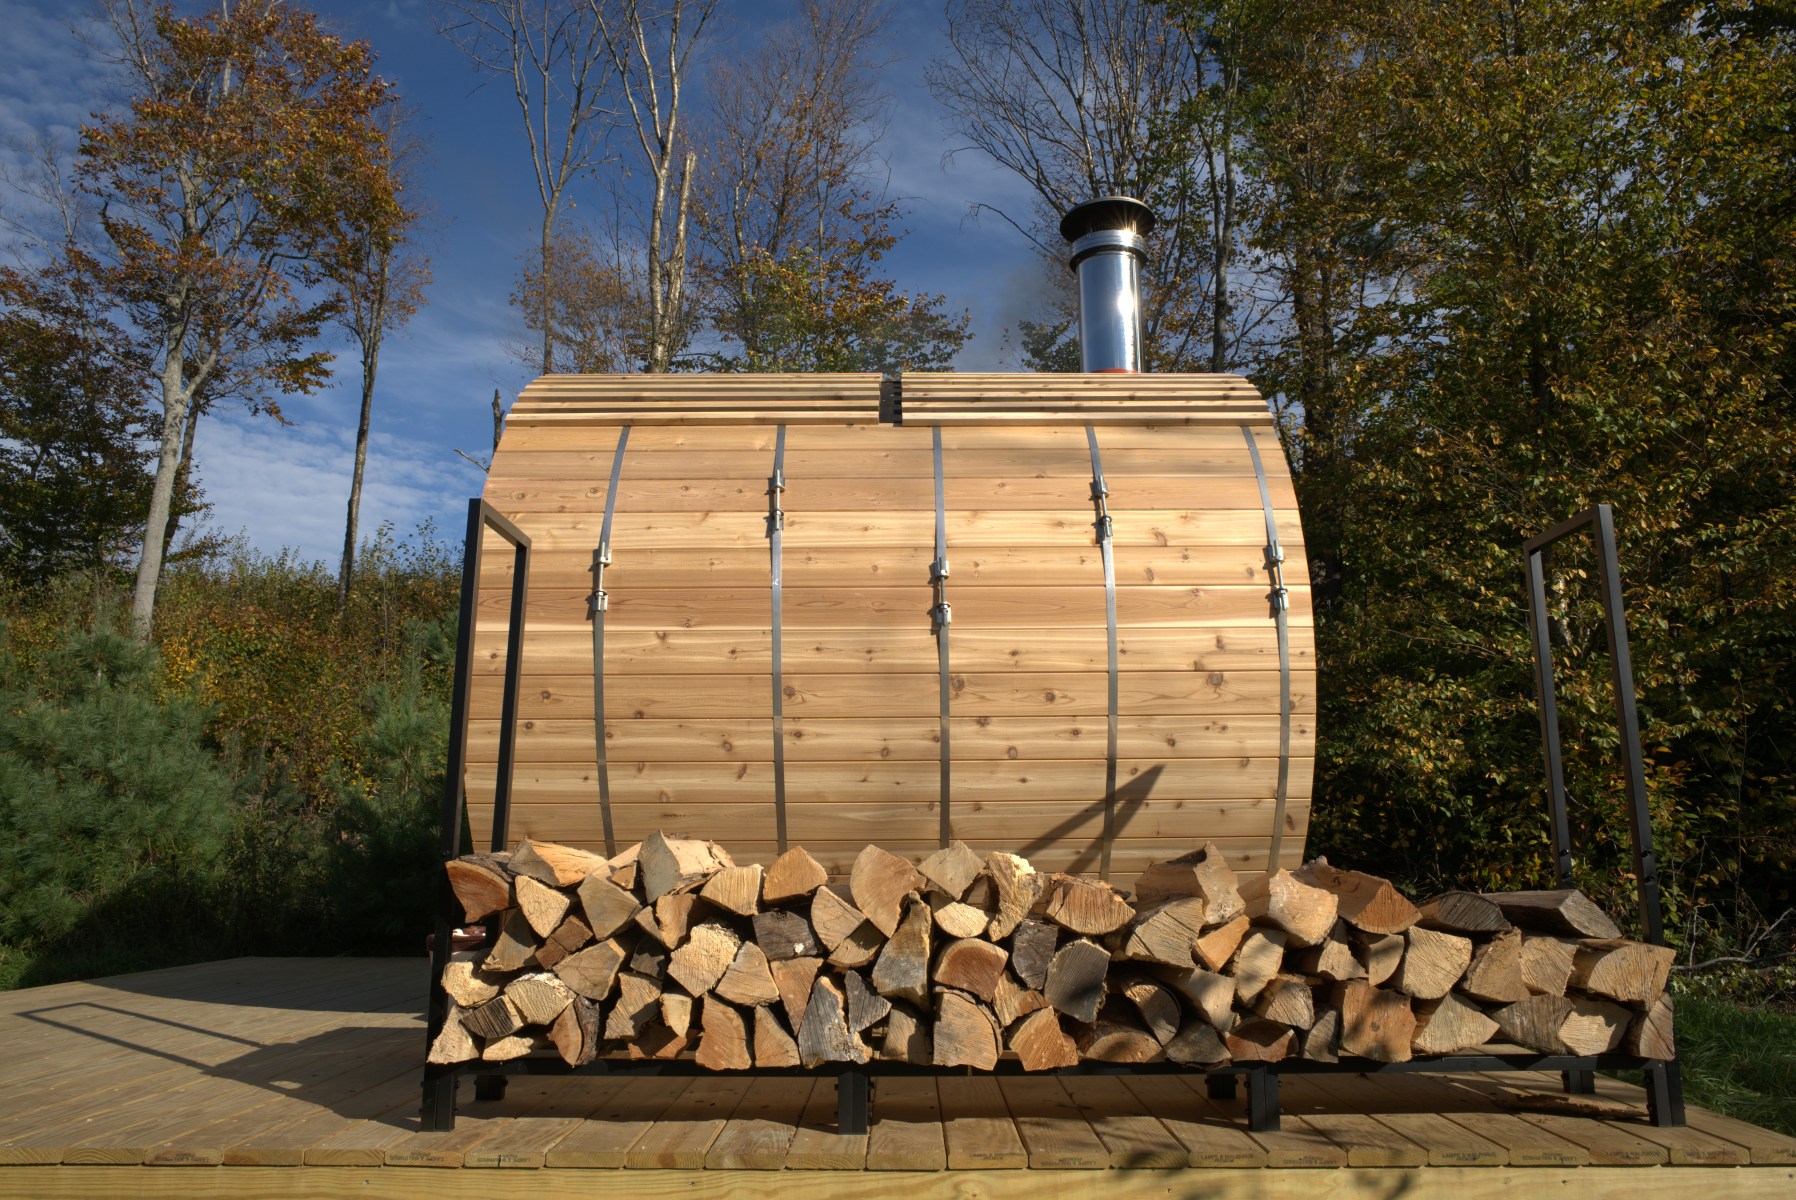
“It’s the same essential premise as building a whiskey barrel. You take the staves, which are generally notched or tongue-and-grooved, then stack them in a sequential path and tape them together. Once you get halfway up, you bring the sides and ends in to hold them in place. You have to creep the boards up, because they aren’t held in — it’s just pressure, they’re gravitationally held. You use tape to hold them together. With the last couple staves, try to jam in as many as you possibly can. Then grab the hoops that go around the sides and tighten those with bolts while simultaneously taking a rubber mallet and banging and hammering the hoop itself around the entire barrel. It’s a two-man job. You hammer one set, tighten it, go to the next one, hammer it, tighten it and keep going back and forth until it’s super tight. Once it rains and that wood gets wet, it’ll expand and become waterproof.”
“It’s the same essential premise as building a whiskey barrel. You take the staves, which are generally notched or tongue-and-grooved, then stack them in a sequential path and tape them together. Once you get halfway up, you bring the sides and ends in to hold them in place. You have to creep the boards up, because they aren’t held in — it’s just pressure, they’re gravitationally held. You use tape to hold them together. With the last couple staves, try to jam in as many as you possibly can. Then grab the hoops that go around the sides and tighten those with bolts while simultaneously taking a rubber mallet and banging and hammering the hoop itself around the entire barrel. It’s a two-man job. You hammer one set, tighten it, go to the next one, hammer it, tighten it and keep going back and forth until it’s super tight. Once it rains and that wood gets wet, it’ll expand and become waterproof.”
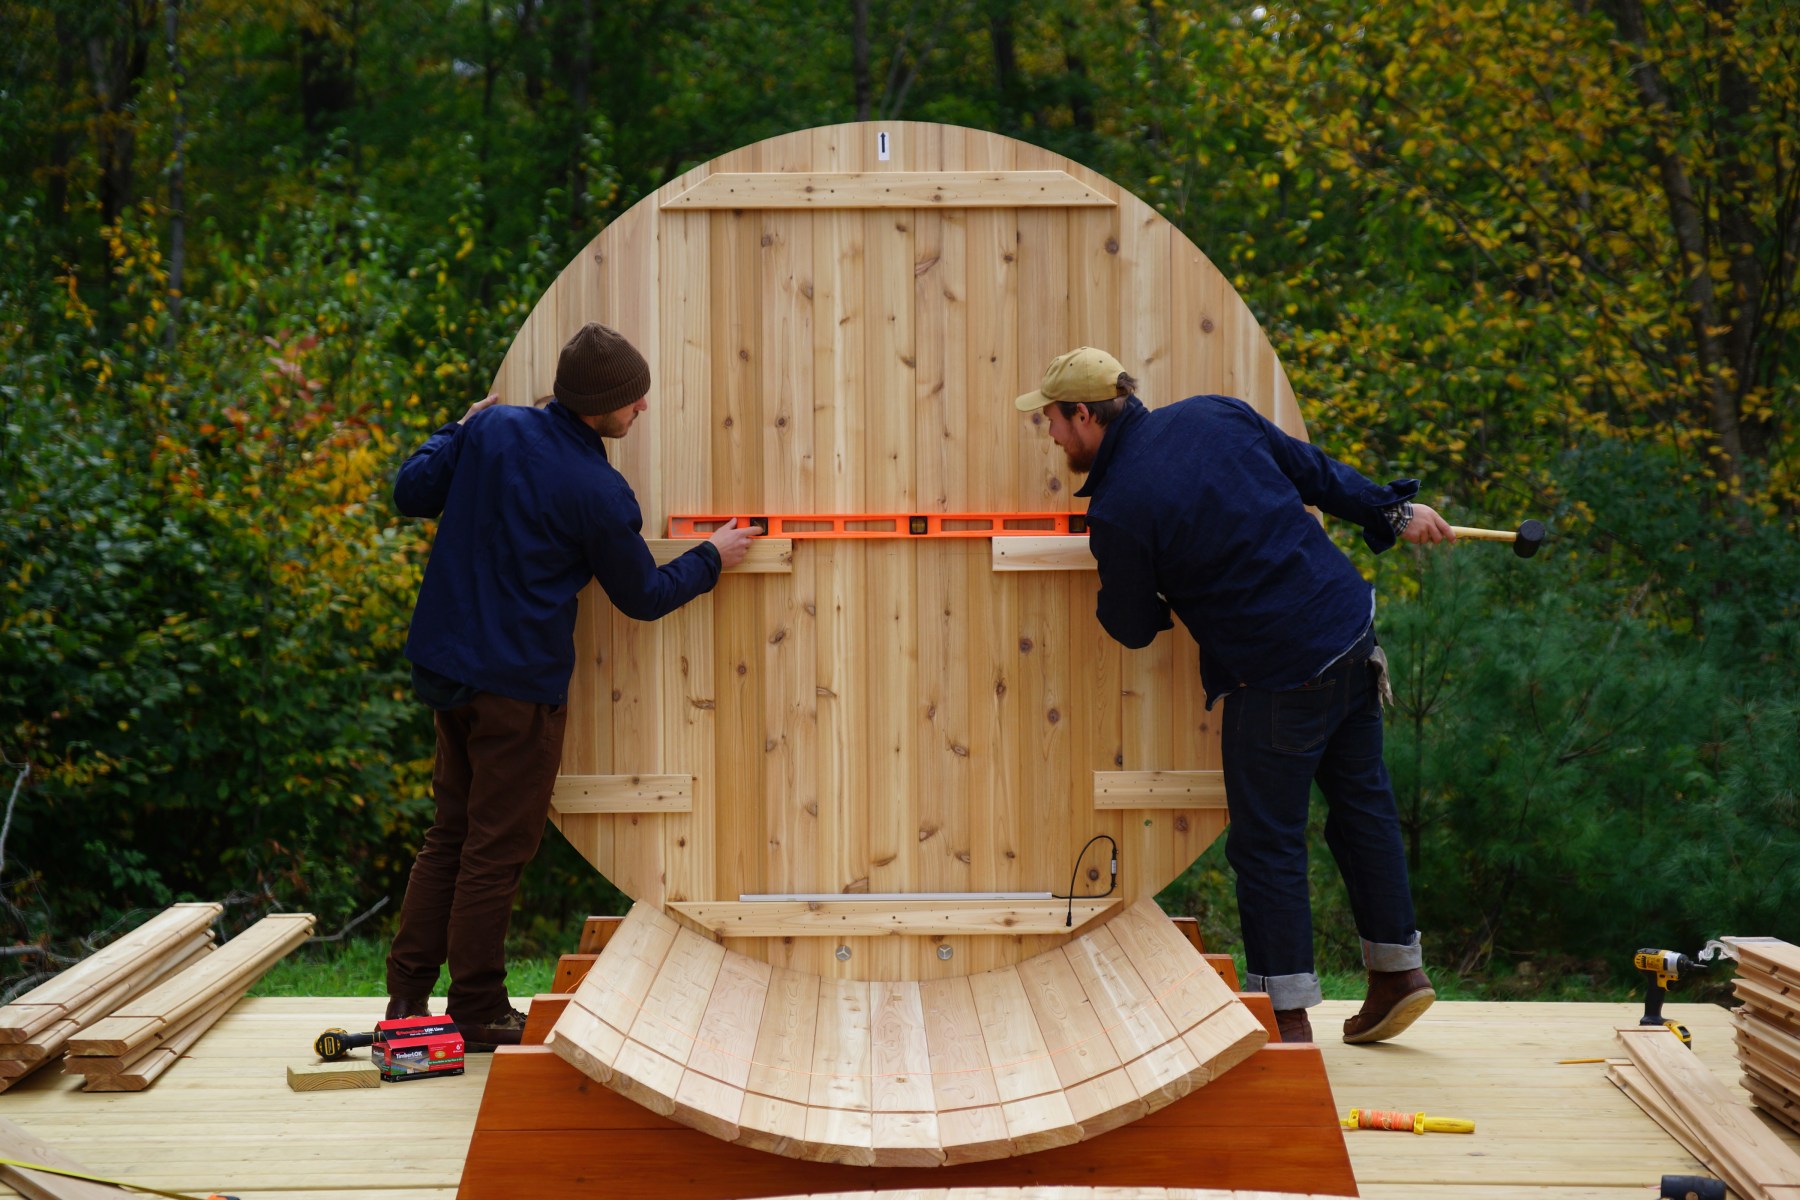
Installing the Ends
“The ends are grooved circular pieces that are married together with furniture pegs — dowels, essentially. In this instance, there was a door that was already prebuilt. Either way, you use the ends to hold those staves in place. You can put staves across the bottom supports because those are rounded. But once you hit the edge of that, there’s nothing for them to hold onto. They’ll legitimately just fall, so at that point you have to bring in the ends. We ran strings to tie the ends together as we placed in the staves to carry up the rest of the sidewalls.”
“The ends are grooved circular pieces that are married together with furniture pegs — dowels, essentially. In this instance, there was a door that was already prebuilt. Either way, you use the ends to hold those staves in place. You can put staves across the bottom supports because those are rounded. But once you hit the edge of that, there’s nothing for them to hold onto. They’ll legitimately just fall, so at that point you have to bring in the ends. We ran strings to tie the ends together as we placed in the staves to carry up the rest of the sidewalls.”

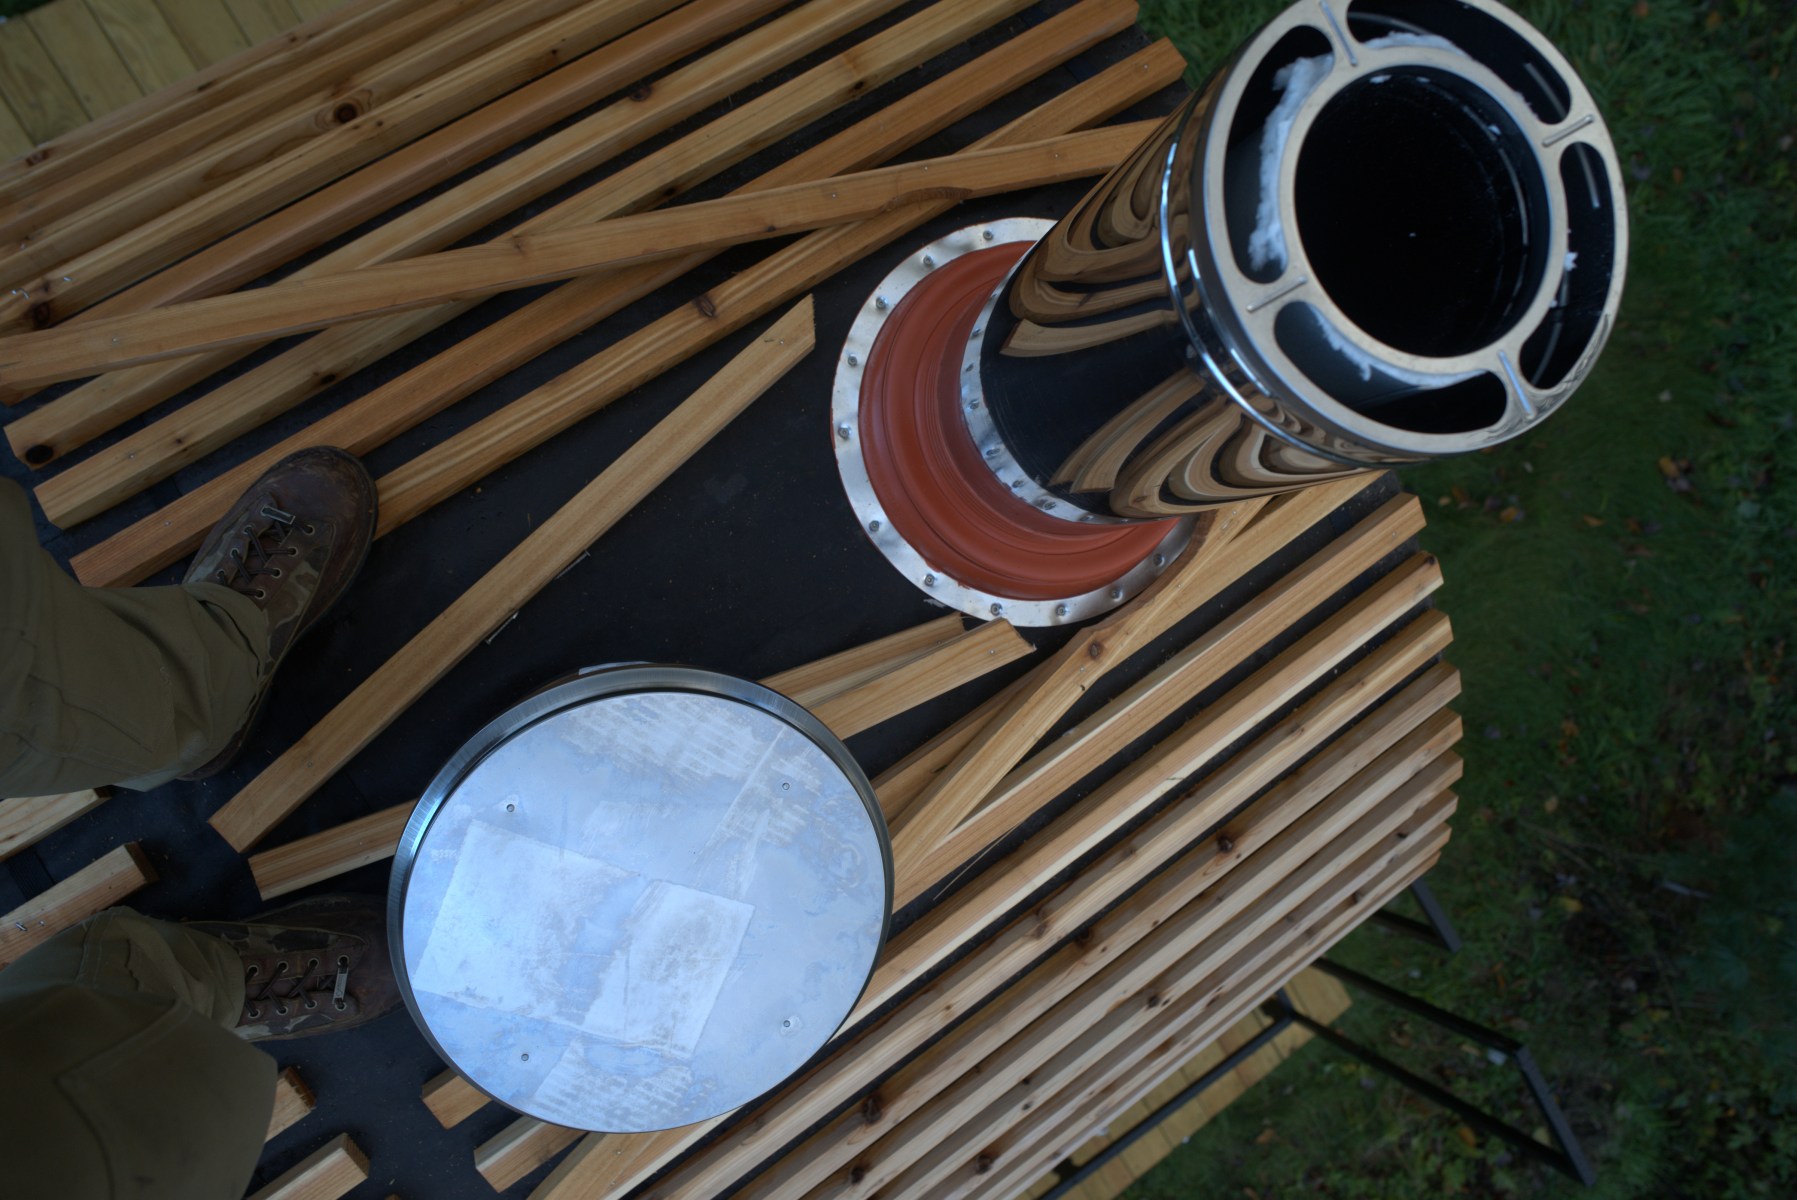
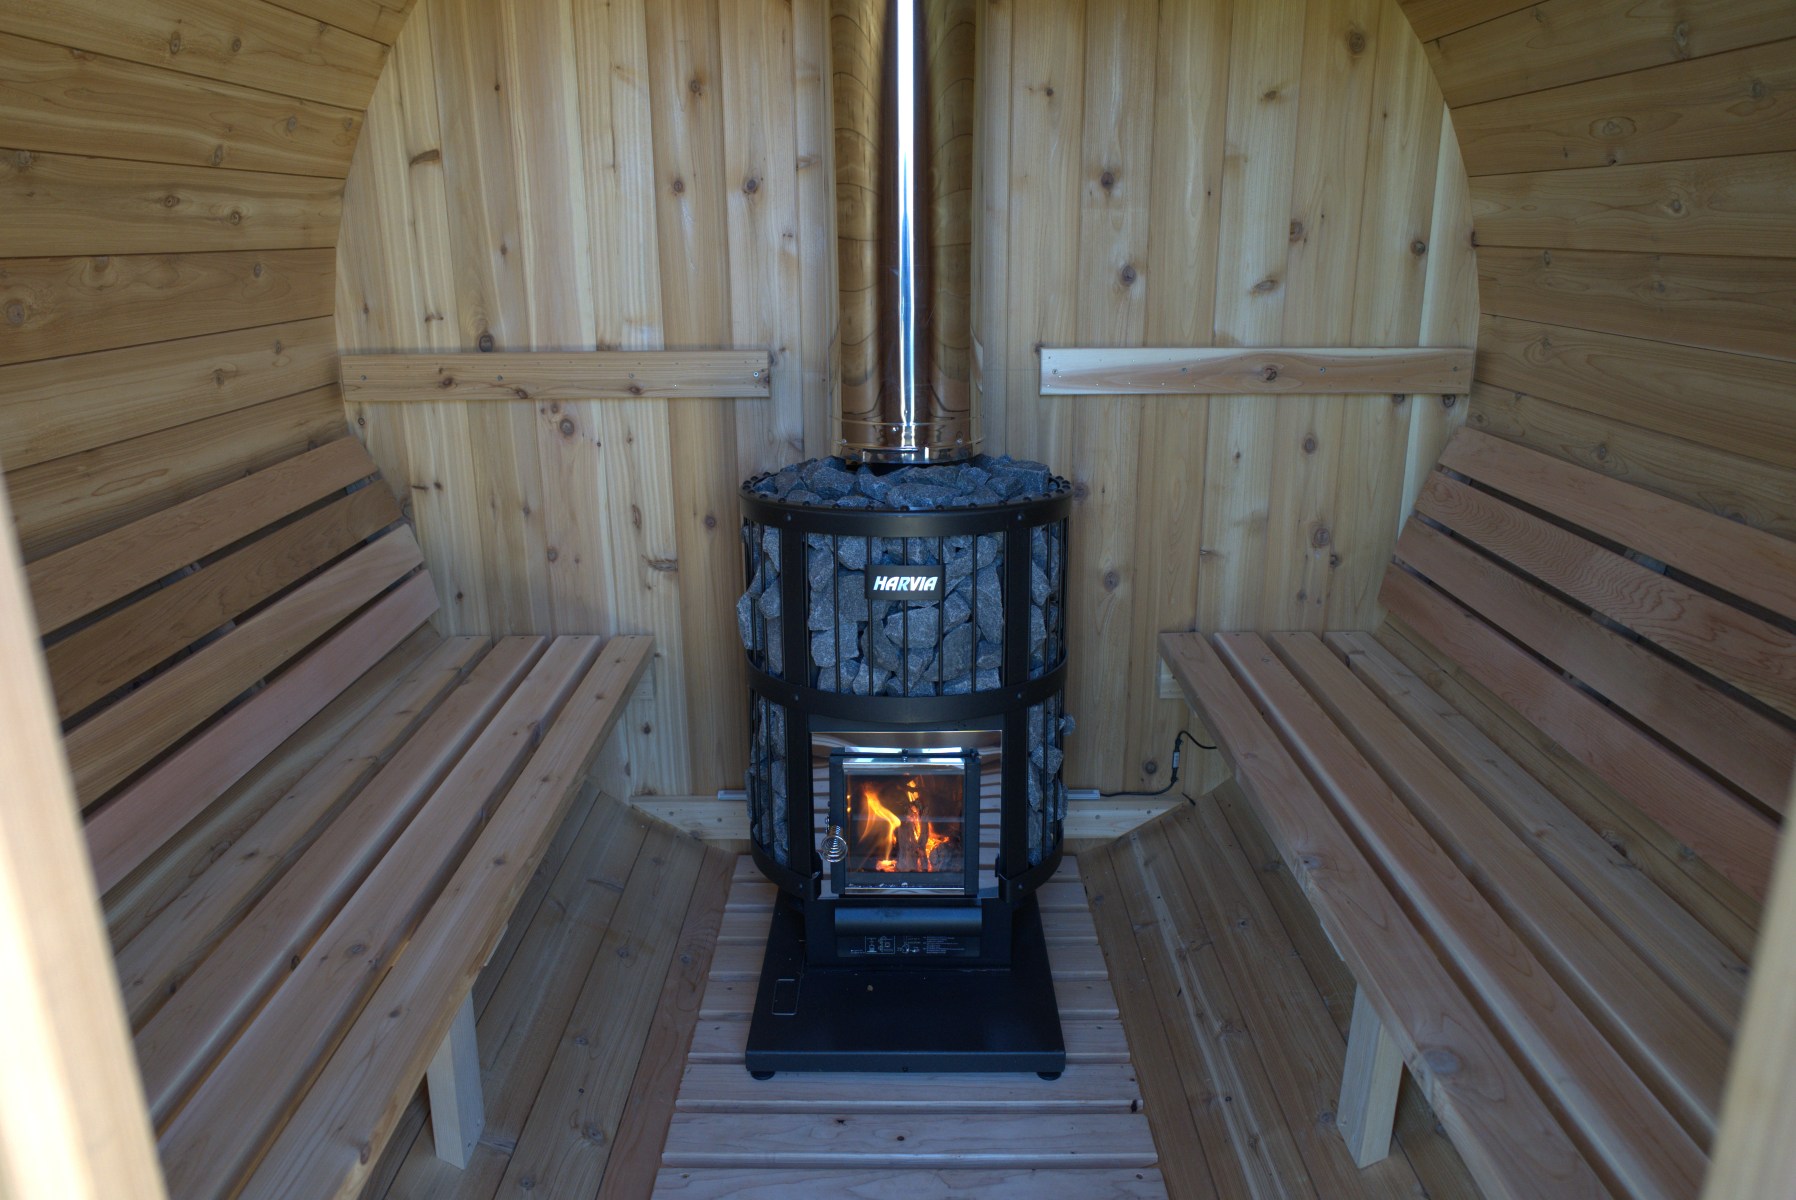
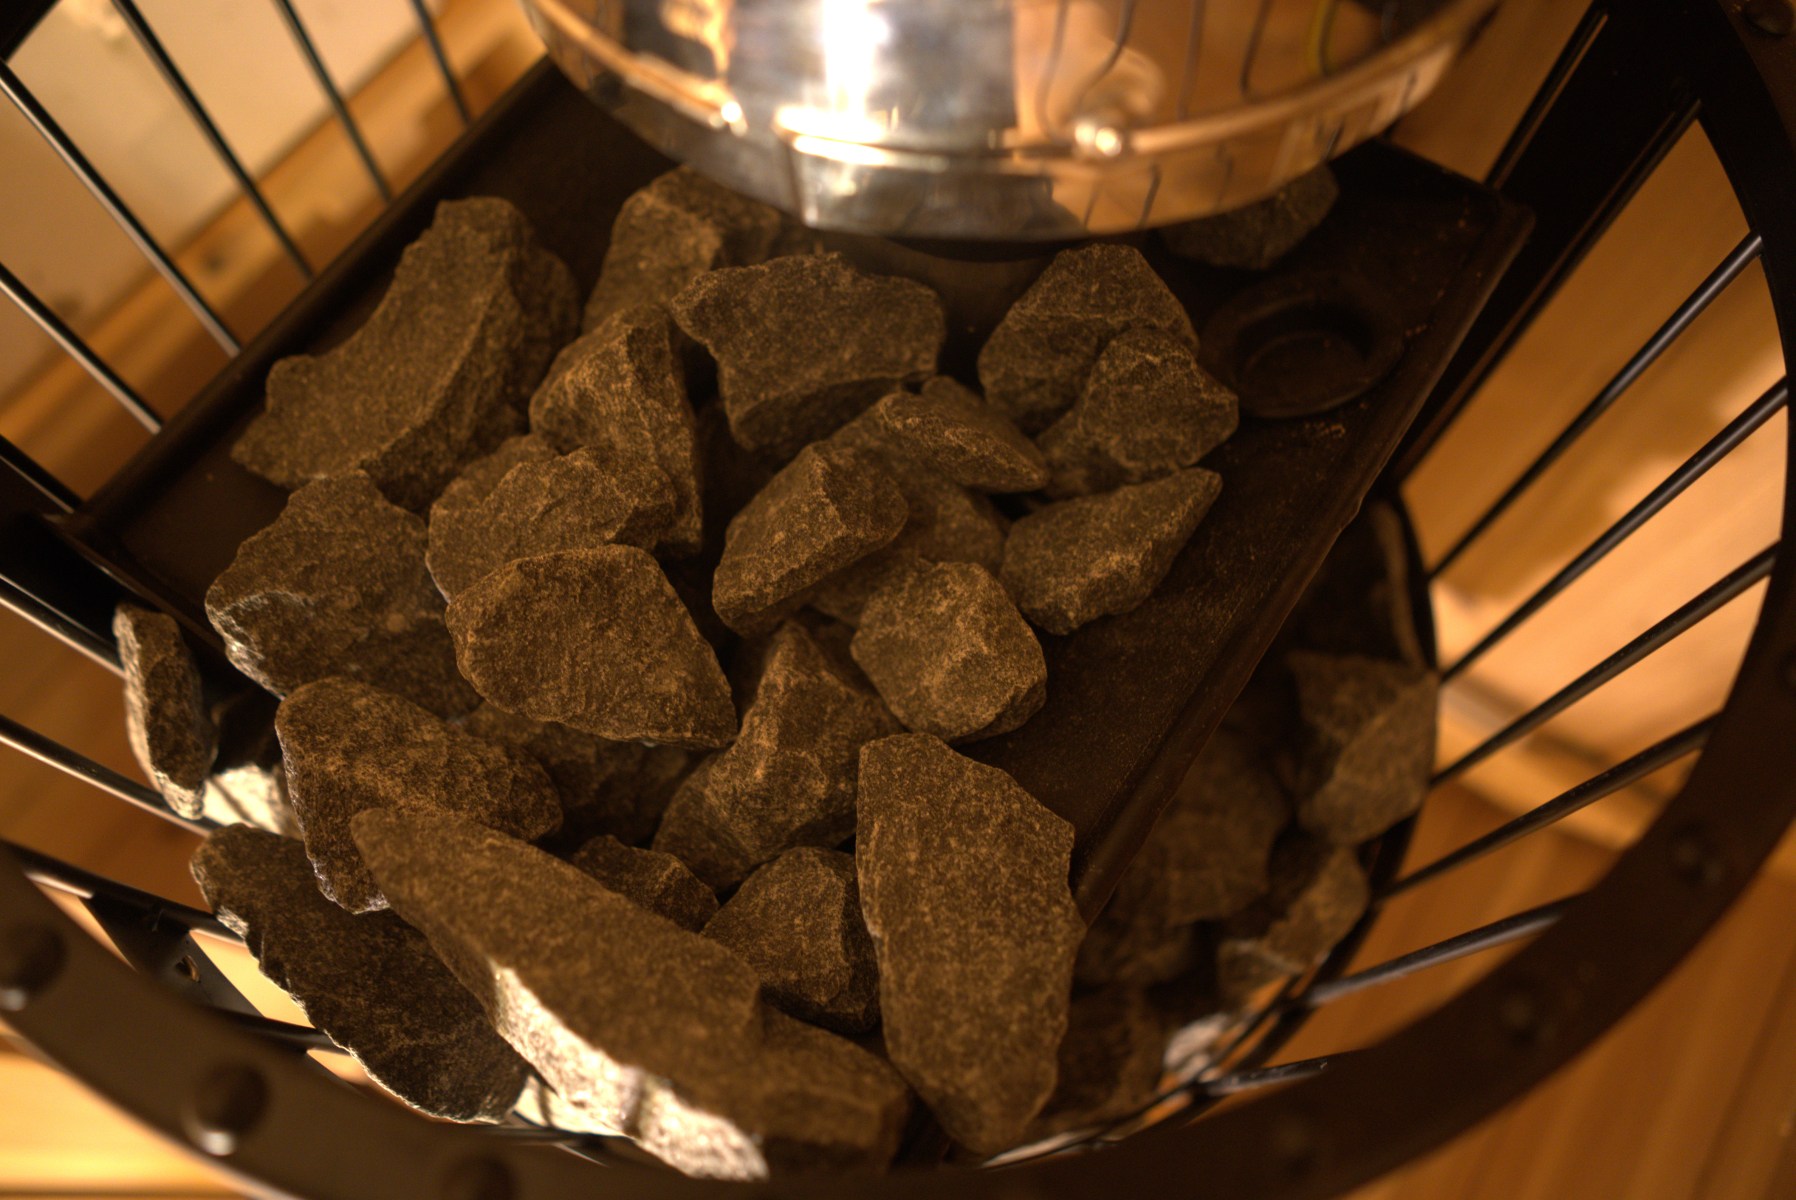
Fitting the Stove
“The stove was made by a Finnish company called Harvia. It’s heavy — maybe 400 to 500 lbs. You have to source a stove that has a heat output rating that corresponds with the size of the sauna based on the cubic feet of space. It’s a balance between getting something that can heat it quickly but not giving up all your space to a stove. If you’re using an electric, you just drop the stove and run the wire out. With this one, the stove pipe is not attached, so you have cut an eight-inch hole in the ceiling of a perfectly finished roof. You put the pipe through then put insulation around the baffle and cap the top of it with a spark arrestor. That way, if there’s any unburned wood, it doesn’t jump out and start a forest fire.”
“The stove was made by a Finnish company called Harvia. It’s heavy — maybe 400 to 500 lbs. You have to source a stove that has a heat output rating that corresponds with the size of the sauna based on the cubic feet of space. It’s a balance between getting something that can heat it quickly but not giving up all your space to a stove. If you’re using an electric, you just drop the stove and run the wire out. With this one, the stove pipe is not attached, so you have cut an eight-inch hole in the ceiling of a perfectly finished roof. You put the pipe through then put insulation around the baffle and cap the top of it with a spark arrestor. That way, if there’s any unburned wood, it doesn’t jump out and start a forest fire.”
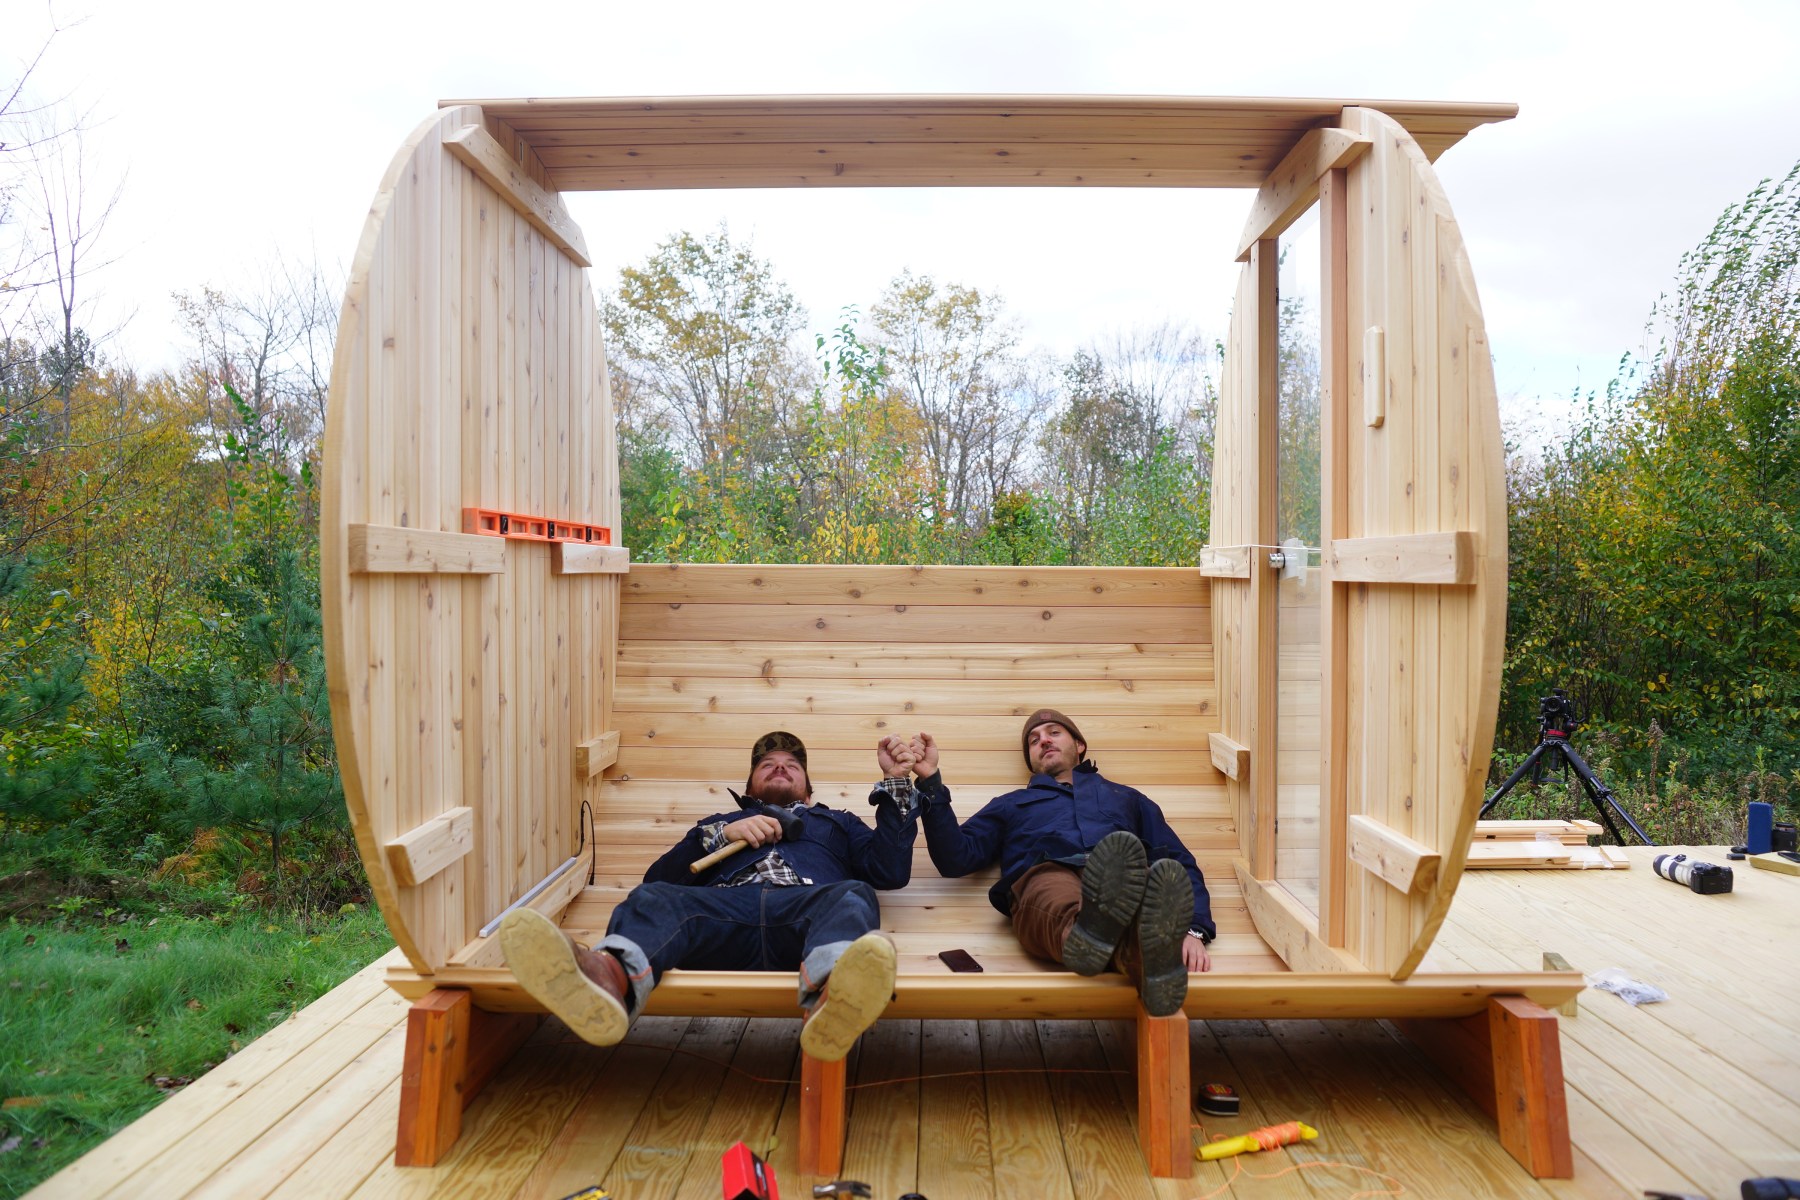
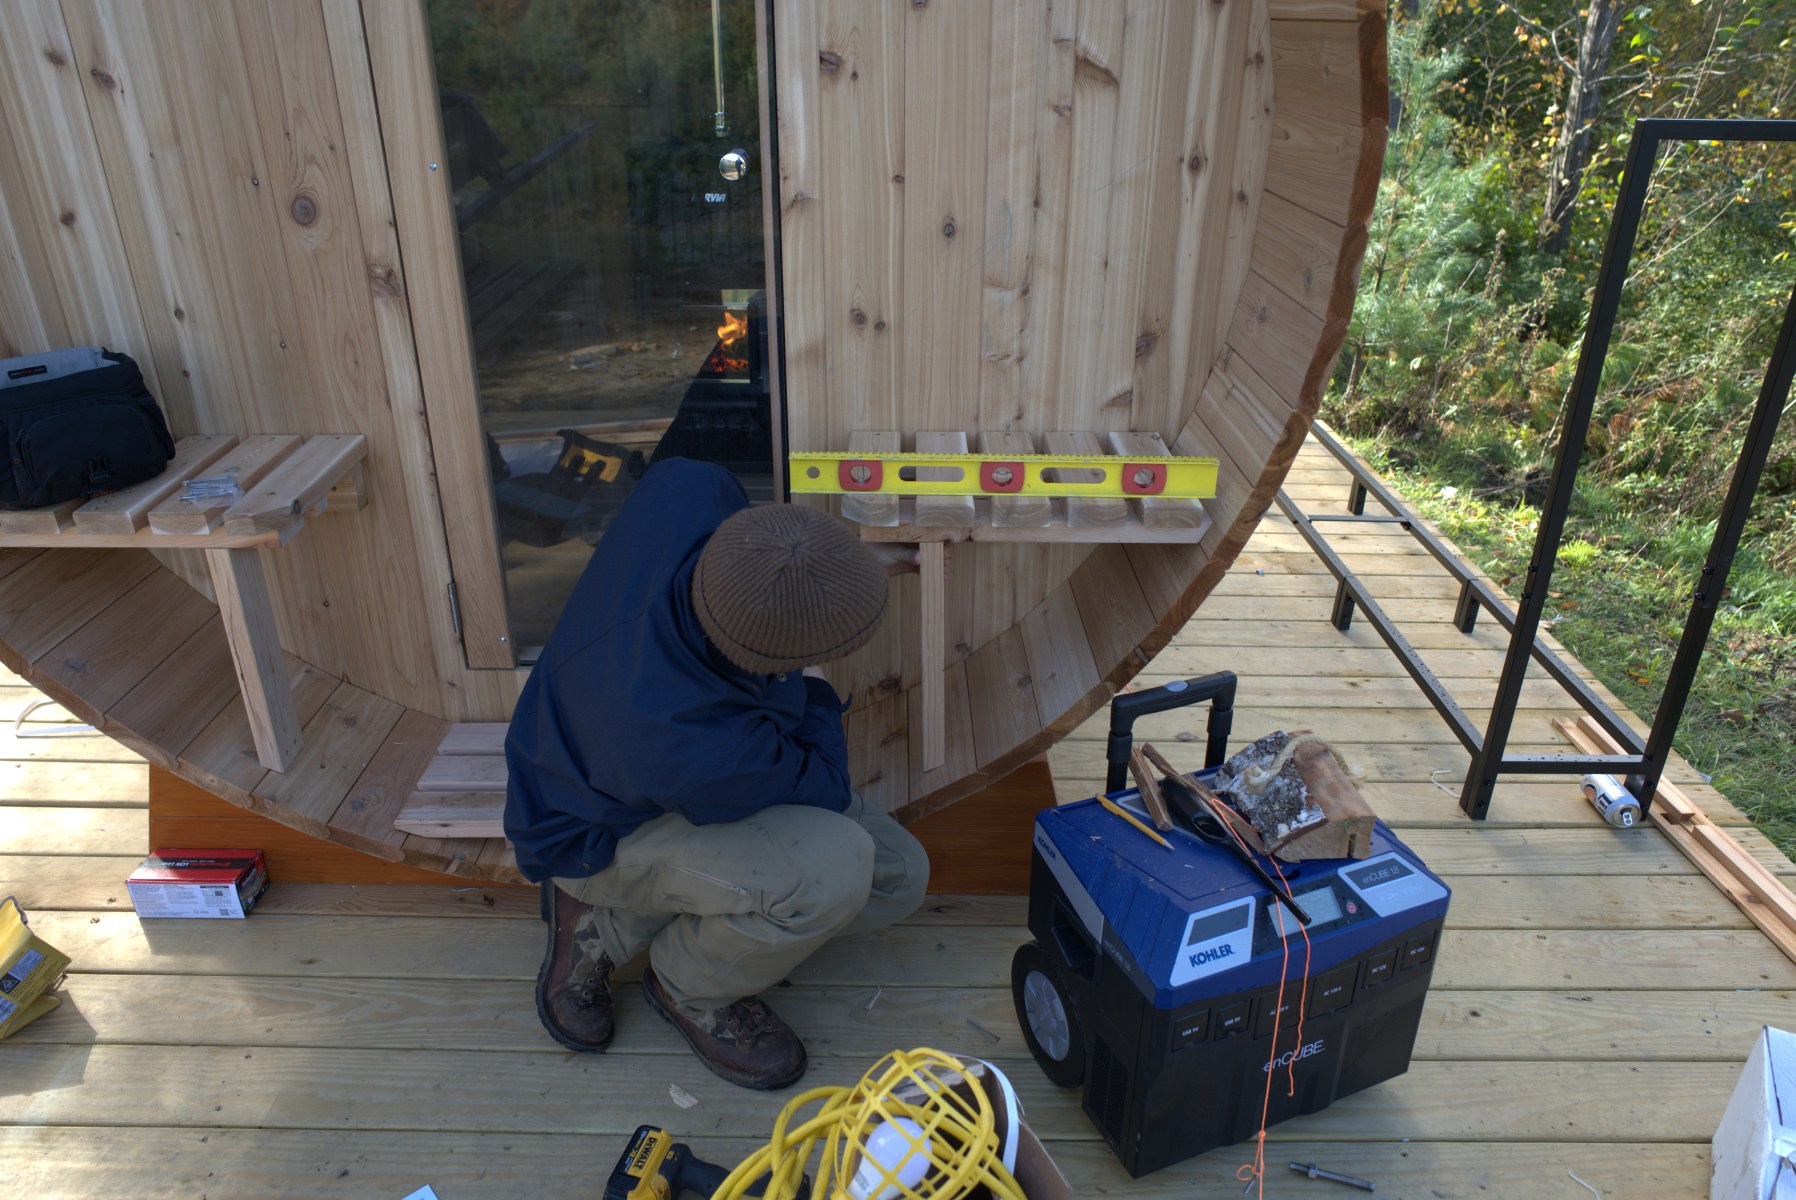
Installing the Benches
“This is pretty straight-forward. Essentially you’re taking the different bench sets and affixing them both to the wall. So there’s a floorboard set that you install to create a walking floor. Then you have seat bottom, seat back … the only tricky thing there is matching the curvature of the bottom to the foot of where the bench comes down. You just have to match that curve angle, which isn’t too difficult, but something to keep in mind.”
“This is pretty straight-forward. Essentially you’re taking the different bench sets and affixing them both to the wall. So there’s a floorboard set that you install to create a walking floor. Then you have seat bottom, seat back … the only tricky thing there is matching the curvature of the bottom to the foot of where the bench comes down. You just have to match that curve angle, which isn’t too difficult, but something to keep in mind.”
Installing the Accessories
“This is just the finishing touches, stuff like a sand timer, fire extinguisher, robe hooks and exterior seats. Since mine is far from the house, I put a fire extinguisher in a little contained box. Just in case — you’re in a wood-burning sauna. It’s made of wood, so if something happens, it probably happens fast. A timer is always a good idea. There are some hooks on the outside for robes and clothes. You can also put these exterior benches outside that let you cool off. Just customize it, make it your own and put on the finishing touches.”
“This is just the finishing touches, stuff like a sand timer, fire extinguisher, robe hooks and exterior seats. Since mine is far from the house, I put a fire extinguisher in a little contained box. Just in case — you’re in a wood-burning sauna. It’s made of wood, so if something happens, it probably happens fast. A timer is always a good idea. There are some hooks on the outside for robes and clothes. You can also put these exterior benches outside that let you cool off. Just customize it, make it your own and put on the finishing touches.”
Building the First Fire
“You know when you start a hairdryer or toaster for the first time, how everything’s burning off? Same deal here. You’ve got to get a fire going and get it ripping pretty hot because you want to burn off all of the paint that’s inside the firebox and the stove and all that. So it’s a process of breaking it in. You’re not wanting to sit in there at the time because of the fumes. I ran it almost for two whole days. Just burning it to get all of the shit out. After probably the third or fourth fire, all the paint and all the smells from the paint and any sort of coatings they use for shipping wear off. And then you’re good to go.”
“You know when you start a hairdryer or toaster for the first time, how everything’s burning off? Same deal here. You’ve got to get a fire going and get it ripping pretty hot because you want to burn off all of the paint that’s inside the firebox and the stove and all that. So it’s a process of breaking it in. You’re not wanting to sit in there at the time because of the fumes. I ran it almost for two whole days. Just burning it to get all of the shit out. After probably the third or fourth fire, all the paint and all the smells from the paint and any sort of coatings they use for shipping wear off. And then you’re good to go.”
Enjoying a Soak
“Once it’s done, you’ve just got to get it going and heat it up to where you want it, which can be anywhere from 120 to 150°F. And then you can either do it dry or with more steam, like a wet sauna. I think the important thing is you don’t want to stay in it too long. There are all sorts of health benefits, everything from heart health to cancer to mobility. Also, it’s relaxing. It’s a good way to get away from the noise and to digitally detox. It’s also pretty good if you have had an aggressive drinking night and want to sweat it out. It sounds like a lot, but if you’re capable, you can get it done in a weekend.”
“Once it’s done, you’ve just got to get it going and heat it up to where you want it, which can be anywhere from 120 to 150°F. And then you can either do it dry or with more steam, like a wet sauna. I think the important thing is you don’t want to stay in it too long. There are all sorts of health benefits, everything from heart health to cancer to mobility. Also, it’s relaxing. It’s a good way to get away from the noise and to digitally detox. It’s also pretty good if you have had an aggressive drinking night and want to sweat it out. It sounds like a lot, but if you’re capable, you can get it done in a weekend.”
This article appeared in an InsideHook newsletter. Sign up for free to get more on travel, wellness, style, drinking, and culture..